Google Agent Executor & Substrate:开源生产级AI Agent运行时的革命性突破
引言:从实验室到生产环境的最后一道鸿沟
2026年5月,Google正式开源了Agent Executor与Agent Substrate两套核心工具,这一举措被业界视为AI Agent工程化进程中最具里程碑意义的事件之一。这两个开源项目的发布,标志着Google正式将内部沉淀多年的生产级AI Agent运行时技术贡献给开源社区,为全球开发者提供了一个从实验脚本到大规模生产部署的完整技术栈。
在过去的几年里,AI Agent从概念走向成熟,从单一的对话助手演变为能够自主规划、调用工具、执行复杂任务的智能系统。然而,尽管模型能力不断提升,将AI Agent部署到生产环境仍然面临巨大挑战:长时间运行的工作流如何保证持久性?服务中断后如何无缝恢复?如何在Kubernetes环境中高效编排数百万个并发Agent?这些问题长期困扰着AI工程师,也成为制约AI Agent大规模落地的关键瓶颈。
Google此次开源的Agent Executor与Agent Substrate,正是为了解决这些核心痛点。本文将深入剖析这两套工具的技术原理、架构设计、代码实现,以及它们对AI产业格局的深远影响。
第一部分:技术背景与产业痛点分析
1.1 AI Agent的技术演进路径
要理解Agent Executor与Substrate的价值,首先需要回顾AI Agent技术的发展脉络。从2019年ReAct(Reasoning + Acting)范式提出,到2023年AutoGPT引领自主Agent热潮,再到2024-2025年多Agent协作系统的成熟,AI Agent技术经历了三个关键阶段:
第一阶段:单体Agent时代(2019-2022)。这个阶段的典型特征是基于单一大型语言模型构建的Agent,通过提示工程实现有限的工具调用能力。代表工作包括ReAct、Toolformer、ChatGPT Plugins等。这一阶段的局限性在于:Agent只能执行短时任务,缺乏状态持久化能力,一旦服务重启,所有上下文和进度都会丢失。
第二阶段:多Agent协作时代(2023-2024)。随着LangChain、LangGraph、AutoGen等框架的兴起,多Agent协作成为主流范式。Agent之间可以通过消息传递实现分工协作,完成更复杂的任务。然而,这一阶段仍然面临一个根本性问题:缺乏可靠的长时间运行机制。当Agent需要执行跨越数小时甚至数天的任务时,如何保证任务的连续性和可恢复性?
第三阶段:生产级Agent时代(2025-至今)。企业级应用对AI Agent提出了更高的要求:可观测性、安全隔离、多租户支持、弹性伸缩等。Google此次开源的Agent Executor与Substrate,正是为满足这些企业级需求而设计的技术栈。
1.2 生产环境的核心挑战
在将AI Agent从实验室推向生产环境的道路上,开发者面临六大核心挑战:
挑战一:状态持久性与恢复机制。传统的Agent运行时在服务中断时会导致正在执行的任务全部丢失。生产环境需要支持checkpoint(检查点)机制,能够在任何时刻保存Agent的完整状态,并在恢复后无缝继续执行。
挑战二:长时间运行的资源管理。Agent可能需要运行数小时甚至数天,这期间需要合理的资源调度和生命周期管理。Kubernetes虽然是容器编排的事实标准,但其默认的设计并不适合长时间运行的有状态任务。
挑战三:水平扩展与多Agent编排。现代企业应用可能需要同时运行数百万个Agent实例,每个Agent可能同时发起数千个并发的工具调用。如何在Kubernetes环境中高效管理这种规模,是一个巨大的工程挑战。
挑战四:安全隔离与权限控制。AI Agent在执行过程中可能生成并运行动态代码,这些代码的可信性和安全性需要严格保障。同时,Agent可能需要访问敏感的外部系统,需要细粒度的权限控制。
挑战五:审计与可观测性。企业需要对Agent的所有行为进行完整的审计跟踪,包括工具调用、决策过程、外部交互等。这要求运行时提供完善的日志、追踪和监控能力。
挑战六:开发者体验与框架兼容性。新的运行时不应该要求开发者重写所有代码,需要与现有的Agent开发框架(如LangChain、LangGraph)无缝集成。
第二部分:Agent Executor深度技术解析
2.1 核心设计理念
Agent Executor是Google开源的长时运行工作流运行时,它的核心设计理念是"持久化执行优先"(Durable Execution First)。与传统的请求-响应式运行时不同,Agent Executor将每个工作流视为一个持久化实体,其状态和进度会被完整保存,使得工作流能够在任何时间点恢复执行。
传统的函数调用模型如下:
# 传统模型:无状态请求-响应
def handle_request(user_input: str) -> str:
    # 每次请求都是全新的上下文
    context = load_context()  # 需要手动加载
    response = llm.generate(context, user_input)
    save_context(context)  # 需要手动保存
    return response
Agent Executor的工作模型:
# Agent Executor模型:持久化状态
from google.agent_executor import AgentExecutor, WorkflowState

class MyAgentWorkflow:
    def __init__(self):
        self.executor = AgentExecutor(
            checkpoint_enabled=True,
            event_logging=True,
            durable_execution=True
        )

    async def run(self, task_id: str, initial_input: dict):
        """
        启动一个持久化的工作流
        工作流可以在任何点中断和恢复
        """
        workflow = await self.executor.create_workflow(
            workflow_id=task_id,
            initial_state={
                "input": initial_input,
                "step": 0,
                "memory": [],
                "results": {}
            }
        )

        # 工作流会持续执行,支持中断和恢复
        result = await workflow.execute()
        return result
2.2 事件驱动架构与状态快照
Agent Executor采用了**事件溯源(Event Sourcing)**架构模式。每个工作流的执行过程被记录为一连串的不可变事件,包括:
- WorkflowCreated:工作流创建事件
- StepStarted:步骤开始事件
- ToolCallRequested:工具调用请求事件
- ToolCallCompleted:工具调用完成事件
- StateSnapshot:状态快照事件
- HumanApprovalRequested:人工审批请求事件
- WorkflowCompleted/Failed:工作流完成/失败事件
这种事件日志的设计带来了几个关键优势:
优势一:完整的审计跟踪。通过回放事件日志,可以重现工作流的完整执行历史,包括每一步的输入、输出和决策理由。
优势二:确定性恢复。无论工作流在任何时刻中断,都可以通过重放事件日志恢复到中断前的状态。
优势三:分支测试。基于某个历史状态快照,可以创建多个分支来测试不同的执行路径。
# 事件日志示例
event_log = [
    WorkflowCreated(timestamp="2026-05-28T10:00:00Z", workflow_id="wf_001"),
    StepStarted(step_id=1, step_name="analyze_requirement", input={"query": "分析销售数据"}),
    ToolCallRequested(tool="sql_executor", params={"query": "SELECT * FROM sales"}),
    ToolCallCompleted(tool="sql_executor", result={"rows": 1500, "columns": 12}),
    StateSnapshot(state={"analysis": {...}, "confidence": 0.85}),
    # 工作流可能在此时中断
]

# 恢复执行
await workflow.resume(from_event=4)
2.3 状态快照机制详解
状态快照(State Snapshotting)是Agent Executor的核心特性之一。与简单的检查点不同,Agent Executor的快照机制具有以下特点:
增量快照:只保存自上次快照以来发生变化的状态部分,大大减少了存储开销。
原子性保证:快照的创建和保存过程是原子的,要么完全成功,要么完全失败,不会出现部分写入的状态。
压缩历史:保留最近N个状态快照的完整副本, older的快照可以压缩为增量diff。
from google.agent_executor.snapshot import StateSnapshotManager

class AdvancedSnapshotManager(StateSnapshotManager):
    """高级快照管理器"""

    def __init__(self, storage_backend, retention_count=10):
        self.storage = storage_backend
        self.retention_count = retention_count
        self.snapshots = {}

    async def create_snapshot(self, workflow_id: str, state: dict) -> str:
        """创建状态快照"""
        snapshot_id = generate_snapshot_id()
        snapshot = {
            "workflow_id": workflow_id,
            "snapshot_id": snapshot_id,
            "timestamp": current_timestamp(),
            "state": state,
            "checksum": compute_checksum(state)
        }

        # 存储快照
        await self.storage.put(f"snapshots/{workflow_id}/{snapshot_id}", snapshot)

        # 清理旧快照
        await self._cleanup_old_snapshots(workflow_id, snapshot_id)

        return snapshot_id

    async def restore_snapshot(self, workflow_id: str, snapshot_id: str) -> dict:
        """恢复指定快照"""
        snapshot = await self.storage.get(f"snapshots/{workflow_id}/{snapshot_id}")
        if not snapshot:
            raise ValueError(f"Snapshot {snapshot_id} not found")

        # 验证快照完整性
        if compute_checksum(snapshot["state"]) != snapshot["checksum"]:
            raise CorruptionError("Snapshot checksum mismatch")

        return snapshot["state"]

    async def get_latest_snapshot(self, workflow_id: str) -> Optional[dict]:
        """获取最新快照"""
        snapshot_ids = await self.storage.list(f"snapshots/{workflow_id}")
        if not snapshot_ids:
            return None

        latest_id = max(snapshot_ids)
        return await self.restore_snapshot(workflow_id, latest_id)
2.4 轨迹分支与A/B测试
Agent Executor引入了一个独特的功能:轨迹分支(Trajectory Branching)。这个功能允许开发者从任意历史状态创建分支,测试不同的执行路径,而不影响主工作流的执行。
from google.agent_executor.branching import TrajectoryBrancher

class TestDifferentStrategies:
    """测试不同策略的分支测试"""

    def __init__(self, executor: AgentExecutor):
        self.executor = executor
        self.brancher = TrajectoryBrancher(executor)

    async def run_ab_test(self, workflow_id: str, strategy_a: str, strategy_b: str):
        """
        基于历史状态创建A/B测试分支
        """
        # 获取当前工作流的最新状态
        current_state = await self.executor.get_state(workflow_id)

        # 创建分支A:使用策略A
        branch_a_id = await self.brancher.create_branch(
            parent_workflow_id=workflow_id,
            parent_snapshot_id=current_state["snapshot_id"],
            branch_id="strategy_a_test",
            override_config={"strategy": strategy_a}
        )

        # 创建分支B:使用策略B
        branch_b_id = await self.brancher.create_branch(
            parent_workflow_id=workflow_id,
            parent_snapshot_id=current_state["snapshot_id"],
            branch_id="strategy_b_test",
            override_config={"strategy": strategy_b}
        )

        # 并行执行两个分支
        result_a = await self.executor.execute_workflow(branch_a_id)
        result_b = await self.executor.execute_workflow(branch_b_id)

        # 比较结果
        return {
            "strategy_a_result": result_a,
            "strategy_b_result": result_b,
            "winner": self._determine_winner(result_a, result_b)
        }
2.5 人工审批与Human-in-the-Loop
生产环境中的许多关键决策需要人工介入。Agent Executor提供了完善的**人工审批(Human-in-the-Loop)**机制,支持在工作流的任意步骤插入人工审批环节。
from google.agent_executor.approval import ApprovalManager, ApprovalRequest

class EnterpriseApprovalWorkflow:
    """企业级审批工作流"""

    def __init__(self):
        self.approval_mgr = ApprovalManager()

    async def run_with_approvals(self, task: dict):
        """带审批的工作流执行"""
        workflow = await self.executor.create_workflow(
            initial_state={"task": task}
        )

        # 定义需要审批的关键步骤
        approval_points = {
            "financial_transfer": {
                "threshold": 10000,
                "approvers": ["finance_manager", "ceo"],
                "timeout": 3600  # 1小时超时
            },
            "data_deletion": {
                "threshold": "any",
                "approvers": ["dpo", "data_owner"],
                "timeout": 7200
            }
        }

        async for step in workflow.step_generator():
            # 检查是否需要审批
            if step.name in approval_points:
                approval_req = ApprovalRequest(
                    workflow_id=workflow.id,
                    step_id=step.id,
                    action=step.name,
                    details=step.details,
                    required_approvers=approval_points[step.name]["approvers"],
                    timeout=approval_points[step.name]["timeout"]
                )

                # 暂停工作流,等待审批
                approved = await self.approval_mgr.request_approval(approval_req)

                if not approved:
                    workflow.cancel(f"Rejected by {approval_req.approvers}")
                    return {"status": "rejected", "reason": approval_req.rejection_reason}

            # 继续执行
            await workflow.execute_step(step)

        return workflow.final_result
第三部分:Agent Substrate深度技术解析
3.1 Kubernetes原生编排架构
Agent Substrate是Google开源的Kubernetes原生Agent编排层,它将Kubernetes的能力与大规模Agent管理需求完美结合。与Agent Executor专注于单个工作流的执行不同,Agent Substrate关注的是如何高效管理数百万个并发的Agent实例。
Agent Substrate的核心设计基于以下几个Kubernetes原生概念:
Pod作为Agent载体:每个Agent实例被封装为一个Pod,拥有独立的资源配额、网络命名空间和存储卷。
Deployment管理生命周期:通过Kubernetes Deployment管理Agent实例的副本数、更新策略和滚动部署。
Service提供服务发现:通过Kubernetes Service实现Agent之间的发现和通信。
ConfigMap/Secret管理配置:通过Kubernetes ConfigMap和Secret管理Agent的配置和敏感信息。
# Agent Substrate CRD (Custom Resource Definition) 示例
apiVersion: agent.googleapis.com/v1
kind: AgentGroup
metadata:
  name: customer-service-agents
  namespace: production
spec:
  agentType: "customer-support"
  replicaCount: 100
  maxConcurrentTasks: 10
  resources:
    requests:
      cpu: "500m"
      memory: "512Mi"
    limits:
      cpu: "2000m"
      memory: "2Gi"
  persistence:
    enabled: true
    storageClass: "fast-ssd"
    accessMode: "ReadWriteMany"
  scaling:
    minReplicas: 10
    maxReplicas: 1000
    targetCPUUtilization: 70
  security:
    serviceAccount: "agent-sa"
    networkPolicy: "agent-network-policy"
    podSecurityPolicy: "restricted"
3.2 Pod快照与状态迁移
在Kubernetes环境中,传统的有状态应用面临一个重大挑战:当Pod被调度到不同的节点时,如何保持状态的连续性?Agent Substrate通过**Pod快照(Pod Snapshotting)**机制解决了这个问题。
from kubernetes import client
from agent_substrate.snapshot import PodSnapshotManager

class AgentPodSnapshotManager(PodSnapshotManager):
    """Agent Pod快照管理器"""

    def __init__(self, k8s_client: client.ApiClient):
        self.k8s = k8s_client
        self.snapshot_api = client.CustomObjectsApi(k8s_client)

    async def create_pod_snapshot(self, pod_name: str, namespace: str) -> str:
        """创建Pod快照"""
        # 获取Pod的完整规格
        pod = self.k8s.read_namespaced_pod(pod_name, namespace)

        # 获取Pod的所有Volumes
        volumes = self._capture_volumes(pod.spec.volumes)

        # 获取Pod的网络状态
        network_state = await self._capture_network_state(pod)

        # 获取Agent的内存状态
        agent_state = await self._capture_agent_state(pod)

        snapshot = {
            "apiVersion": "agent.googleapis.com/v1",
            "kind": "AgentPodSnapshot",
            "metadata": {
                "generateName": f"{pod_name}-snapshot-"
            },
            "spec": {
                "originalPod": pod.metadata.name,
                "originalNode": pod.spec.node_name,
                "volumes": volumes,
                "networkState": network_state,
                "agentState": agent_state
            }
        }

        # 创建快照资源
        snapshot_obj = self.snapshot_api.create_namespaced_custom_object(
            group="agent.googleapis.com",
            version="v1",
            namespace=namespace,
            plural="agentpodsnapshots",
            body=snapshot
        )

        return snapshot_obj["metadata"]["name"]

    async def restore_pod_from_snapshot(
        self,
        snapshot_name: str,
        namespace: str,
        target_node: str = None
    ) -> str:
        """从快照恢复Pod"""
        snapshot = self.snapshot_api.get_namespaced_custom_object(
            group="agent.googleapis.com",
            version="v1",
            namespace=namespace,
            plural="agentpodsnapshots",
            name=snapshot_name
        )

        # 重建Pod规格
        new_pod_spec = self._reconstruct_pod_spec(snapshot["spec"])

        # 如果指定了目标节点,设置节点亲和性
        if target_node:
            new_pod_spec.affinity = client.V1Affinity(
                node_affinity=client.V1NodeAffinity(
                    required_during_scheduling_ignored_during_execution=client.V1NodeSelector(
                        node_selector_terms=[
                            client.V1NodeSelectorTerm(
                                match_expressions=[
                                    client.V1NodeSelectorRequirement(
                                        key="kubernetes.io/hostname",
                                        operator="In",
                                        values=[target_node]
                                    )
                                ]
                            )
                        ]
                    )
                )
            )

        # 创建新Pod
        new_pod = client.V1Pod(
            api_version="v1",
            kind="Pod",
            metadata=client.V1ObjectMeta(
                generate_name=f"{snapshot['spec']['originalPod']}-restored-"
            ),
            spec=new_pod_spec
        )

        created_pod = self.k8s.create_namespaced_pod(namespace, new_pod)
        return created_pod.metadata.name
3.3 超大规模并发管理
Agent Substrate被设计为能够管理100 million+的注册Agent和1 million+的并发工具调用。这种规模的管理需要一系列精心设计的工程技术。
分布式状态存储:使用etcd集群存储Agent的注册信息和状态,通过分布式一致性保证数据的高可用。
分层缓存:在Agent Substrate和etcd之间引入多级缓存,减少对中心存储的访问压力。
流量调度:智能的负载均衡算法,确保请求均匀分布到各个Agent实例。
from agent_substrate.scheduler import AgentScheduler
from agent_substrate.load_balancer import AgentLoadBalancer

class HyperscaleAgentManager:
    """超大规模Agent管理器"""

    def __init__(
        self,
        scheduler: AgentScheduler,
        load_balancer: AgentLoadBalancer,
        state_store,
        cache_layers
    ):
        self.scheduler = scheduler
        self.load_balancer = load_balancer
        self.state_store = state_store
        self.cache = cache_layers

    async def register_agent(self, agent: AgentMetadata) -> str:
        """注册新Agent"""
        # 生成唯一ID
        agent_id = self.scheduler.generate_agent_id()

        # 检查缓存
        cached = await self.cache.get(f"agent:{agent.type}")
        if cached and cached.count < cached.capacity:
            # 直接分配到现有Pod
            return await self._assign_to_pod(agent_id, cached.pod_id)

        # 注册到状态存储
        agent_record = {
            "id": agent_id,
            "type": agent.type,
            "version": agent.version,
            "registered_at": current_timestamp(),
            "status": "active"
        }
        await self.state_store.put(f"agents/{agent_id}", agent_record)

        # 更新索引缓存
        await self.cache.put(f"agent_index:{agent.type}", agent_id)

        return agent_id

    async def route_tool_call(self, tool_call: ToolCallRequest) -> ToolCallResponse:
        """路由工具调用到合适的Agent"""
        # L1缓存:检查热点Tool的最近路由
        cache_key = f"route:{tool_call.tool_name}:{tool_call.tenant_id}"
        cached_route = await self.cache.get(cache_key)

        if cached_route:
            return await self._execute_tool_call(cached_route.agent_id, tool_call)

        # 查询状态存储获取可用Agent
        agent_ids = await self.state_store.get(
            f"agent_index:{tool_call.tool_name}"
        )

        if not agent_ids:
            raise NoAvailableAgentError(f"No agent available for tool: {tool_call.tool_name}")

        # 负载均衡选择
        selected_agent = await self.load_balancer.select(
            candidates=agent_ids,
            criteria=tool_call.routing_criteria
        )

        # 缓存路由结果
        await self.cache.put(cache_key, selected_agent, ttl=60)

        return await self._execute_tool_call(selected_agent, tool_call)
3.4 安全隔离与防护机制
AI Agent面临的安全威胁与传统应用有显著不同。Agent可能会执行动态生成的代码,访问敏感数据,或被恶意提示词攻击。Agent Substrate提供了多层安全防护:
沙箱隔离:支持GKE Sandbox和Kata Containers两种隔离技术,确保Agent的代码执行不会影响宿主系统。
网络策略:默认拒绝所有网络流量,Agent只能访问明确允许的目标。
最小权限原则:每个Agent只被授予完成其任务所需的最小权限集。
提示词注入防护:运行时内容过滤器检测并阻止恶意的提示词注入攻击。
from agent_substrate.security import (
    AgentSecurityManager,
    SandboxConfig,
    NetworkPolicy,
    IAMPolicy
)

class SecureAgentDeployment:
    """安全Agent部署配置"""

    def __init__(self):
        self.security_mgr = AgentSecurityManager()

    def create_sandbox_config(self) -> SandboxConfig:
        """创建沙箱配置"""
        return SandboxConfig(
            runtime="gke-sandbox",  # 或 "kata-containers"
            filesystem_readonly=True,
            filesystem_whitelist=[
                "/tmp/agent_workspace",
                "/var/agent_data"
            ],
            network_mode="none",  # 完全禁用网络,或使用 "whitelist"
            allowed_networks=[
                "internal-mesh",
                "agent-api-backend"
            ],
            resources=ResourceLimits(
                cpu_period=100000,
                cpu_quota=200000,
                memory_limit=2 * 1024 * 1024 * 1024,  # 2GB
                pids_limit=100
            ),
            syscalls_filter=[
                # 允许的系统调用
                "read", "write", "open", "close",
                "brk", "mmap", "mprotect",
                "sched_yield", "nanosleep"
                # 禁止的危险系统调用
            ]
        )

    def create_network_policy(self) -> NetworkPolicy:
        """创建网络策略"""
        return NetworkPolicy(
            policy_type="default_deny",  # 默认拒绝所有
            ingress_rules=[
                # 只允许来自API Gateway的流量
                AllowedSource(
                    pod_selector={"component": "api-gateway"},
                    ports=[8080]
                )
            ],
            egress_rules=[
                # 只允许访问特定的外部服务
                AllowedDestination(
                    pod_selector={"component": "agent-backend"},
                    ports=[8080, 9090]
                ),
                AllowedDestination(
                    dns=["internal-mesh.svc.cluster.local"],
                    ports=[443]
                )
            ]
        )

    def create_iam_policy(self) -> IAMPolicy:
        """创建IAM策略"""
        return IAMPolicy(
            service_account="agent-service-account",
            role_bindings=[
                RoleBinding(
                    role="roles/agent.tool-access",
                    # 只允许访问特定的工具
                    allowed_tools=["sql-query", "file-read", "http-request"]
                ),
                RoleBinding(
                    role="roles/data.reader",
                    # 只允许读取特定的数据源
                    allowed_resources=[
                        "projects/*/datasets/reporting_data",
                        "projects/*/buckets/reports"
                    ]
                ),
                # 禁止的操作
                DeniedBinding(
                    role="roles/owner",
                    reason="Agent must never have owner privileges"
                )
            ]
        )
第四部分:架构设计与集成模式
4.1 整体架构概览
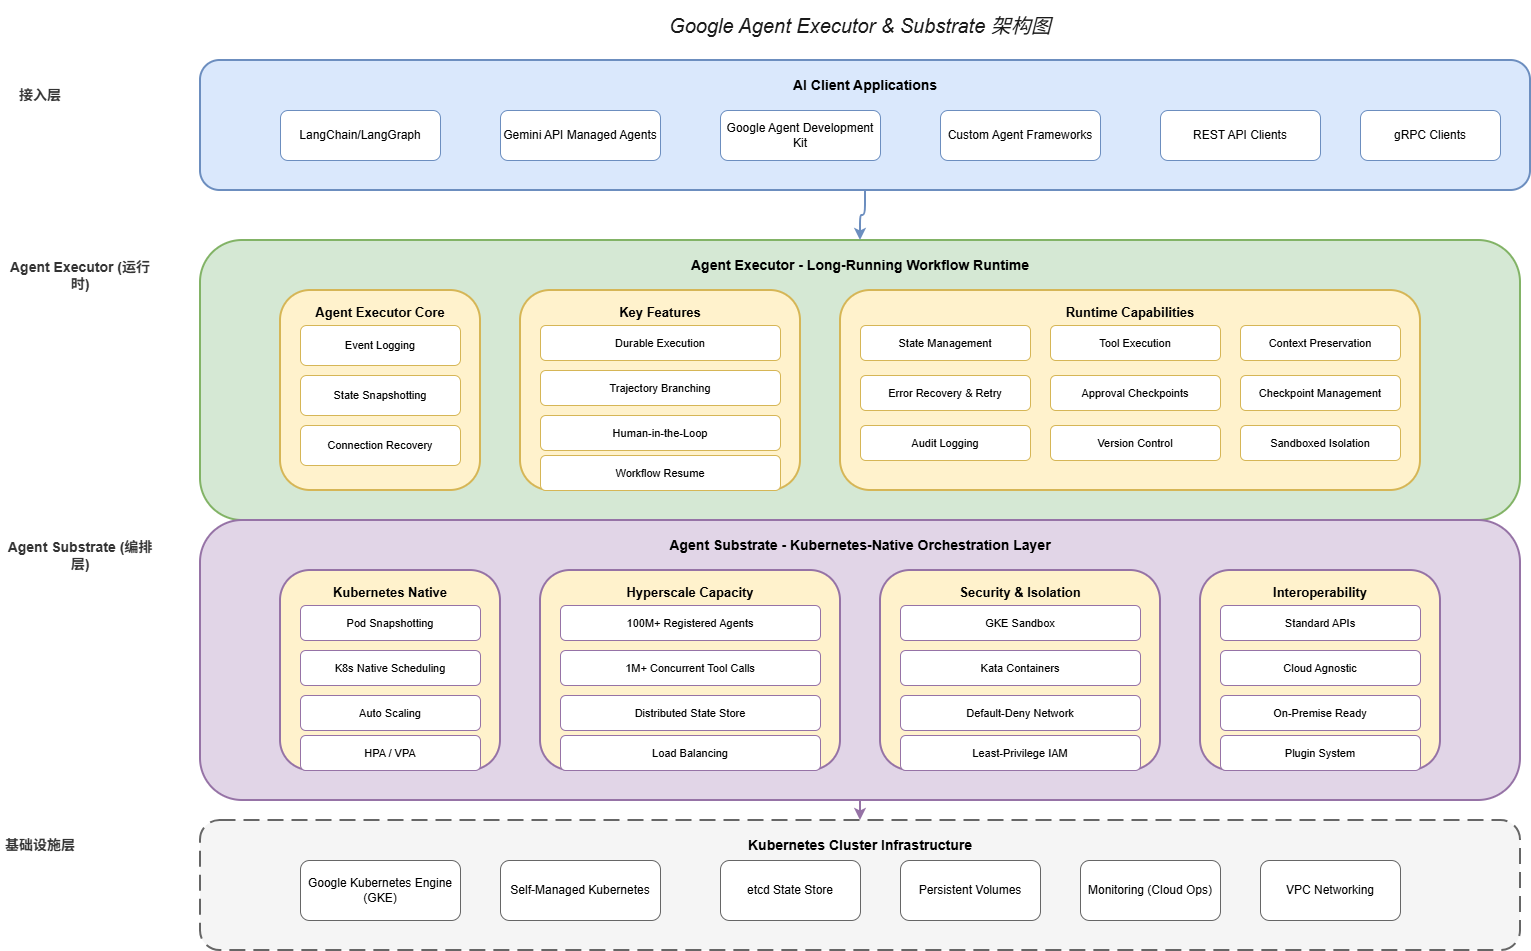
Google Agent Executor与Substrate共同构成了一个完整的两层架构:
Agent Executor层(执行层):负责单个工作流的生命周期管理、状态持久化、事件记录、人机交互。
Agent Substrate层(编排层):负责多Agent的注册发现、调度分配、弹性伸缩、安全隔离。
┌─────────────────────────────────────────────────────────────────┐
│                      AI Client Applications                      │
│        (LangChain / LangGraph / Gemini API / Custom SDK)        │
└────────────────────────────┬────────────────────────────────────┘
                             │
                             ▼
┌─────────────────────────────────────────────────────────────────┐
│                      Agent Executor Layer                        │
│                    (Long-Running Workflow Runtime)                │
│  ┌──────────────┐  ┌─────────────────┐  ┌───────────────────────┐ │
│  │ Event Logger │  │ State Snapshot  │  │ Human-in-the-Loop    │ │
│  └──────────────┘  └─────────────────┘  └───────────────────────┘ │
│  ┌──────────────┐  ┌─────────────────┐  ┌───────────────────────┐ │
│  │Trajectory    │  │ Workflow Resume │  │ Connection Recovery   │ │
│  │Branching     │  │                 │  │                       │ │
│  └──────────────┘  └─────────────────┘  └───────────────────────┘ │
└────────────────────────────┬────────────────────────────────────┘
                             │
                             ▼
┌─────────────────────────────────────────────────────────────────┐
│                      Agent Substrate Layer                       │
│                    (Kubernetes-Native Orchestration)              │
│  ┌──────────────┐  ┌─────────────────┐  ┌───────────────────────┐ │
│  │Pod Snapshot  │  │ K8s Scheduling  │  │ Hyperscale Capacity  │ │
│  │Management    │  │                 │  │ (100M+ Agents)        │ │
│  └──────────────┘  └─────────────────┘  └───────────────────────┘ │
│  ┌──────────────┐  ┌─────────────────┐  ┌───────────────────────┐ │
│  │ GKE Sandbox  │  │ Network Policy │  │ Interoperability     │ │
│  │ Kata Cont.   │  │ Default-Deny   │  │ (LangChain/LangGraph)│ │
│  └──────────────┘  └─────────────────┘  └───────────────────────┘ │
└────────────────────────────┬────────────────────────────────────┘
                             │
                             ▼
┌─────────────────────────────────────────────────────────────────┐
│                    Kubernetes Cluster                            │
│              (GKE / Self-Managed / Multi-Cloud)                  │
└─────────────────────────────────────────────────────────────────┘
4.2 与现有框架的集成
Agent Executor与Substrate被设计为与现有的Agent开发框架无缝集成。目前已支持的框架包括:
LangChain集成:
from langchain.agents import AgentExecutor as LCAgentExecutor
from google.agent_executor import AgentExecutor, Adapter

# 创建Agent Executor适配器
adapter = Adapter(
    executor=AgentExecutor(
        checkpoint_enabled=True,
        event_logging=True
    )
)

# 使用LangChain的ReAct Agent
agent = create_langchain_react_agent(
    model=ChatGoogleGenerativeAI(model="gemini-2.0"),
    tools=my_tools,
    prompt=my_prompt
)

# 通过适配器运行,支持持久化
chain = LCAgentExecutor(
    agent=agent,
    tools=my_tools,
    adapter=adapter  # 注入Agent Executor能力
)

# 执行,支持中断和恢复
result = await chain.arun("分析本月的销售数据")
LangGraph集成:
from langgraph.graph import StateGraph
from google.agent_executor import AgentExecutor, CheckpointSaver

# 定义状态图
graph = StateGraph(SalesAnalysisState)

graph.add_node("research", research_node)
graph.add_node("analyze", analyze_node)
graph.add_node("report", report_node)

graph.set_entry_point("research")
graph.add_edge("research", "analyze")
graph.add_edge("analyze", "report")
graph.set_finish_point("report")

# 编译,启用Agent Executor的checkpoint
compiled_graph = graph.compile(
    checkpoint=CheckpointSaver(
        executor=AgentExecutor(checkpoint_enabled=True)
    )
)

# 运行,状态自动持久化
async for state in compiled_graph.astream(initial_state):
    print(state)
4.3 多云与混合部署支持
Agent Substrate支持多种部署模式,包括:
纯GKE部署:利用GKE的所有高级特性,包括 Autopilot、Security Posture等。
混合云部署:Agent Substrate的控制平面运行在GKE,数据平面可以部署到其他云或本地数据中心。
纯私有化部署:完全在本地Kubernetes集群中运行,适合对数据主权有严格要求的场景。
from agent_substrate.deployment import (
    DeploymentConfig,
    CloudProvider,
    HybridConfig
)

# GKE部署配置
gke_config = DeploymentConfig(
    provider=CloudProvider.GKE,
    project="my-gcp-project",
    region="us-central1",
    features=[
        "autopilot",
        "security_posture",
        "binary_authorization"
    ]
)

# 混合云配置
hybrid_config = HybridConfig(
    control_plane=DeploymentConfig(
        provider=CloudProvider.GKE,
        project="my-gcp-project",
        region="us-central1"
    ),
    data_planes=[
        DataPlaneConfig(
            provider=CloudProvider.AWS,
            region="us-east-1",
            agent_count=10000
        ),
        DataPlaneConfig(
            provider=CloudProvider.AZURE,
            region="eastus",
            agent_count=10000
        ),
        DataPlaneConfig(
            provider=CloudProvider.SELF_HOSTED,
            location="on-prem-datacenter",
            agent_count=50000
        )
    ],
    data_routing=DataRoutingPolicy(
        prefer_local=True,
        fallback_cloud=CloudProvider.GKE
    )
)
第五部分:代码实战示例
5.1 端到端示例:智能客服Agent
以下是一个完整的智能客服Agent示例,展示了如何结合Agent Executor和Substrate构建生产级应用:
import asyncio
from typing import Optional
from dataclasses import dataclass, field
from enum import Enum

from google.agent_executor import AgentExecutor, WorkflowState
from agent_substrate import AgentGroup, ScalingConfig
from langchain_google_genai import ChatGoogleGenerativeAI
from langchain.tools import tool

# ========== 工具定义 ==========

@dataclass
class CustomerContext:
    """客户上下文"""
    customer_id: str
    tier: str  # 'basic', 'premium', 'enterprise'
    account_age_days: int
    previous_tickets: list = field(default_factory=list)

@tool
def lookup_customer(customer_id: str) -> dict:
    """查询客户信息"""
    # 实际实现中会调用CRM API
    return {
        "customer_id": customer_id,
        "tier": "premium",
        "account_age_days": 365,
        "previous_tickets": ["TICKET-001", "TICKET-002"]
    }

@tool
def get_order_history(customer_id: str) -> list:
    """获取订单历史"""
    return [
        {"order_id": "ORD-001", "date": "2026-05-01", "amount": 299.99},
        {"order_id": "ORD-002", "date": "2026-05-15", "amount": 149.99}
    ]

@tool
def create_support_ticket(
    customer_id: str,
    subject: str,
    description: str,
    priority: str
) -> str:
    """创建支持工单"""
    ticket_id = f"TICKET-{hash(subject) % 100000}"
    return ticket_id

@tool
def send_email(to: str, subject: str, body: str) -> bool:
    """发送邮件"""
    return True

# ========== Agent实现 ==========

class CustomerServiceAgent:
    """智能客服Agent"""

    def __init__(self):
        # 初始化LLM
        self.llm = ChatGoogleGenerativeAI(
            model="gemini-2.0-pro",
            temperature=0.7
        )

        # 初始化Agent Executor
        self.executor = AgentExecutor(
            checkpoint_enabled=True,
            event_logging=True,
            durable_execution=True
        )

        # 工具列表
        self.tools = [
            lookup_customer,
            get_order_history,
            create_support_ticket,
            send_email
        ]

        # 业务规则
        self.escalation_threshold = {
            "basic": 500,  # 金额超过500需要升级
            "premium": 1000,
            "enterprise": float("inf")  # 不升级
        }

    def _build_system_prompt(self, customer_tier: str) -> str:
        """构建系统提示词"""
        tier_prompts = {
            "basic": "你是一位专业客服,代表公司为客户提供优质服务。",
            "premium": "你是高级客服,可以提供更详细的技术支持和解决方案。",
            "enterprise": "你是企业级客服专家,可以提供全方位的企业支持和定制化服务。"
        }

        return f"""
{tier_prompts.get(customer_tier, tier_prompts['basic'])}

工作流程:
1. 首先查询客户信息,了解客户背景
2. 根据客户问题类型收集必要信息
3. 提供解决方案或创建工单
4. 对于高价值客户(订单超过${self.escalation_threshold.get(customer_tier, 500)}),
   自动升级到高级客服

沟通原则:
- 使用友好、专业的语气
- 复杂问题用简单语言解释
- 永远不要承诺无法兑现的事情
"""

    async def handle_customer_request(
        self,
        workflow_id: str,
        customer_id: str,
        request: str
    ) -> dict:
        """处理客户请求"""

        # 获取客户上下文
        customer = lookup_customer.invoke(customer_id)
        customer_context = CustomerContext(
            customer_id=customer_id,
            tier=customer["tier"],
            account_age_days=customer["account_age_days"]
        )

        # 构建初始状态
        initial_state = {
            "customer": customer_context,
            "request": request,
            "conversation_history": [],
            "escalated": False,
            "resolution": None
        }

        # 创建工作流
        workflow = await self.executor.create_workflow(
            workflow_id=workflow_id,
            initial_state=initial_state
        )

        try:
            # 执行处理流程
            result = await self._process_with_retry(workflow)
            return {
                "status": "resolved",
                "workflow_id": workflow_id,
                "result": result
            }
        except HumanApprovalRequired as e:
            # 需要人工审批(如退款超过阈值)
            return {
                "status": "pending_approval",
                "workflow_id": workflow_id,
                "approval_details": e.details
            }
        except Exception as e:
            return {
                "status": "failed",
                "workflow_id": workflow_id,
                "error": str(e)
            }

    async def _process_with_retry(
        self,
        workflow: WorkflowState,
        max_retries: int = 3
    ) -> dict:
        """带重试的处理逻辑"""

        for attempt in range(max_retries):
            try:
                # 构建提示词
                prompt = self._build_workflow_prompt(workflow.current_state)

                # 调用LLM
                response = await self.llm.agenerate([prompt])

                # 解析响应并执行工具调用
                actions = self._parse_llm_response(response)

                for action in actions:
                    if action.type == "tool_call":
                        result = await workflow.execute_tool(
                            action.tool_name,
                            action.parameters
                        )
                        workflow.add_to_history(action, result)
                    elif action.type == "escalate":
                        workflow.update_state({"escalated": True})
                    elif action.type == "resolve":
                        workflow.update_state({
                            "resolution": action.resolution
                        })

                # 检查是否完成
                if workflow.current_state.get("resolution"):
                    return workflow.current_state["resolution"]

            except ToolCallError as e:
                if attempt == max_retries - 1:
                    raise
                # 重试逻辑
                await asyncio.sleep(2 ** attempt)

        raise MaxRetriesExceededError("Failed after maximum retries")

# ========== 部署配置 ==========

def create_production_deployment() -> AgentGroup:
    """创建生产部署配置"""

    return AgentGroup(
        name="customer-service-prod",
        agent_type="customer-support",
        scaling=ScalingConfig(
            min_replicas=10,
            max_replicas=1000,
            target_concurrent_requests=100,
            scale_up_cooldown=60,
            scale_down_cooldown=300
        ),
        resources=ResourceRequirements(
            requests={"cpu": "1", "memory": "2Gi"},
            limits={"cpu": "4", "memory": "8Gi"}
        ),
        security=SecurityConfig(
            sandbox_enabled=True,
            network_policy="customer-service-netpol",
            service_account="customer-service-sa"
        ),
        persistence=PersistenceConfig(
            enabled=True,
            checkpoint_interval_seconds=30,
            max_checkpoints_per_workflow=100
        )
    )

# ========== 主程序 ==========

async def main():
    agent = CustomerServiceAgent()
    deployment = create_production_deployment()

    # 启动Agent Group
    await deployment.deploy()

    # 处理客户请求
    result = await agent.handle_customer_request(
        workflow_id="wf_cs_20260528_001",
        customer_id="CUST-12345",
        request="我想申请退货,订单号ORD-002"
    )

    print(f"处理结果: {result}")

if __name__ == "__main__":
    asyncio.run(main())
第六部分:产业影响与未来展望
6.1 对AI工程化的深远影响
Google开源Agent Executor与Substrate,标志着AI Agent工程化进入了一个新阶段:
降低企业门槛:此前,只有拥有强大工程团队的大型科技公司才能构建生产级Agent系统。开源后,中小型企业也能获得同样的能力。
标准化进程加速:开源社区将围绕这些核心组件形成标准化接口和最佳实践,推动整个行业的互操作性。
创新加速:开发者可以将精力集中在应用创新上,而非重复造轮子。
6.2 生态系统演化预测
短期(1-2年):
- LangChain、LangGraph等主流框架将深度集成Agent Executor
- 云服务商将提供托管版的Agent Executor & Substrate
- 大量垂直领域的Agent解决方案将涌现
中期(2-5年):
- Agent运行时将成为AI应用的基础设施层
- 多Agent协作的标准协议将逐步形成
- Serverless Agent执行模式将成为可能
长期(5年+):
- 自主Agent将成为企业数字劳动力的重要组成部分
- Agent之间的协作将更加自动化和智能化
- 通用Agent运行时标准可能出现
6.3 技术演进方向
基于当前的技术发展轨迹,我们预见以下演进方向:
更强的状态管理能力:包括更高效的增量快照、跨工作流的状态共享、分布式事务支持。
更智能的资源调度:基于机器学习的自适应调度,根据工作负载特征自动优化资源配置。
更完善的安全机制:包括形式化验证的Agent行为、零信任架构的全面实施、隐私计算技术的集成。
更丰富的开发者工具:包括可视化的工作流调试器、实时状态追踪、性能分析器等。
结论
Google开源Agent Executor与Substrate,是AI Agent领域的一个里程碑事件。这两套工具不仅解决了生产环境部署的核心挑战,更为整个行业提供了一个可信赖的技术基础。随着这些工具的广泛采用,我们有理由相信,AI Agent的大规模落地将进入快车道。
对于AI工程师而言,现在是学习和采用这些技术的最佳时机。通过深入理解这些工具的设计理念和实现细节,我们能够更好地构建下一代AI应用,推动人工智能技术走向更广阔的应用场景。
参考资源
- Google Agent Executor GitHub Repository: https://github.com/google/agent-executor
- Google Agent Substrate GitHub Repository: https://github.com/google/agent-substrate
- Kubernetes Documentation: https://kubernetes.io/docs/
- LangChain Documentation: https://python.langchain.com/
- Gartner AI Agent Governance Framework Report, May 2026
作者注:本文基于2026年5月28日的最新信息编写。AI技术发展迅速,建议读者持续关注官方文档和社区动态,以获取最新信息。